
QUICK LINKS
Make bread | Other ideas
Did you know? The structure of your sourdough starter will determine the structure of your baked sourdough bread?
Puffy sourdough starter = Puffy sourdough bread.
Flat sourdough starter = Flat sourdough bread.
So getting a good rise out of your sourdough starter sets you up for better success with your sourdough bread.
It’s that simple and, fellow bakers… this simple ‘tip’ is a game-changer.
There are many reasons sourdough bread can emerge dense and flat from the oven and your sourdough starter is one of them. Sometimes your sourdough starter or the sourdough bread dough doesn’t grow as you expected.
Sourdough is a living organism and while mostly predictable, it does, have a life of its own (literally!) and sometimes it requires a little TLC. I know how disappointing it can be when this happens and the maze of troubleshooting that follows. The variables are many; it can be difficult to work out the cause.
When your sourdough starter works as it should SO many of your sourdough troubleshooting days are over!
Quite simply, when your starter works – so does your dough. Yes, things can go wrong with your bread dough but if you use our easy no-knead method, you’ll find it’s packed with tips and simple hacks that boycott the ‘dough’ pitfall and have you baking successful loaves of sourdough bread from now on!
So let’s tackle your sourdough starter.
If you’re having troubles making a sourdough starter, I highly recommend purchasing one. You will be baking in far less time with far fewer hassles and disappointments. You can choose from a wide variety (try ETSY) and it you know the starter has had previous baking succcess and sshould be strong enough to raise bread. Since this is not a post on how to grow a sourdough starter but help a struggling one… I am going to assume you have purchased and/or have a sourdough starter that you have grown yourself, and it (or you) just need a little help.
3 Simple tips for improving your starter growing process
The importance of a humble elastic band

Add an elastic band to your sourdough starter ‘regime’. This simple piece of equipment will help you know if your starter is working properly and exactly when it’s ready for making dough.
When you feed your sourdough starter place the elastic band at the level of the mix when just fed.
If growing properly, the starter will begin to rise above the level of the band and you will see by how much it grows, before it stops.
Sourdough starter should at least doulble before it stops. Once it stops, it’s hit its peak, will wait to be fed and then start to go down again (delfate).
Anything growth above the elastic band that’s twice or more of that below it, is good. Your sourdough starter is working! And… it’s ready to make dough, or be fed again.
Each time you feed your sourdough starter, move the rubber band to mark the new level of sourdough starter inside the jar. That way you can always see when it has doubled.
Warmth
Sourdough likes the same temperatures as you. It will struggle when its cold or hot. It grows faster in warm temperatures and slower in cold. It could be that your sourdough starter needs more warmth OR more time to get going.
For some ideas on utilising some warm places you probably already have at home see How to keep sourdough starter warm, even in winter. Looked after and given the right environment, sourough starter will have difficulty not growing!
Doubling
This is your indicator! Your sourdough starter is ready for the next step. In every instance, when your sourdough starter doubles, you need to feed it or use it in your recipe.
Now that you know what to look for and how to look for it… what’s going on inside that little jar of yours?

Check 1: FLOUR
What are you feeding your sourdough starter?
Check that your flour is wheat, spelt, rye, wholewheat or similar.
Now we need to check the protein. Buying a bag of bread flour because it says ‘Bread Flour’ on the front doesn’t alwasy translate to making success sourdough bread. What will translate is the protein content.
So, check the nutritional label on the packet to see if the flour contains at least 12-13% protein? The protein should be a minimum of 12g per 100g. (or 0.42oz per 3.5oz). 1% can make a big difference!
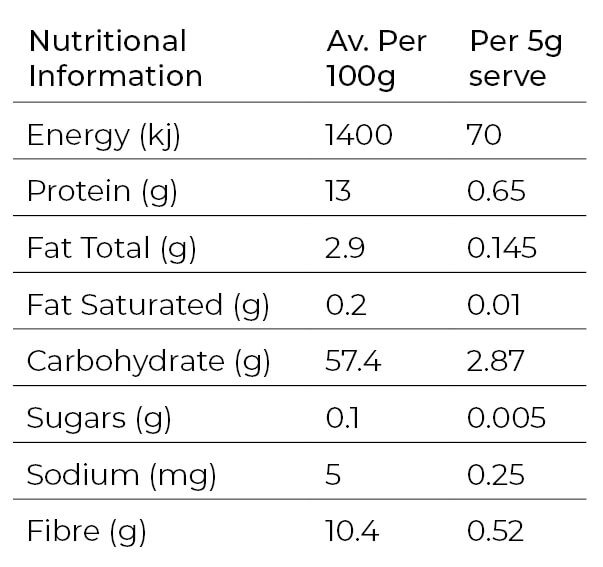
☝️ This table shows 13g per 100g whci is 13% protein. It’s good to go!
While you’re looking at the information on the flour bag, check the due-by date. Fresh flour contains micro-organisms that are beneficial to the sourdough culture and are often less available in flour that has gone past its due-by date.
For more information on bread flour explore these articles. Flour is labelled and categorised quite differently across the globe. Watching someone make sourdough successfully with All-Purpose flour… will likely not be using AP flour from Australia!
If you think it is youf flour, the fix may be that simple. If your flour is looking good, let’s see what else could be going on.
Check 2: Sourdough starter structure + the EASIEST FIX
If your sourdough starter…
Looks like it hasn’t grown but it is bubbly and runny; it has already doubled and gone past this point to become deflated. The good news is your sourdough starter is working!! It was just left too long (at that temperature) and it’s hungry!
RESCUE/FIX: Weigh the sourdough starter and feed it with its own weight in both bread flour and water. If you have a lot, discard 2/3 before weighing and feeding. Leave to double. Sorted. 😊
If your sourdough starter…
Is dense and looks like it hasn’t grown… it hasn’t. The fermentation process hasn’t been completed and needs some help getting started. The most common reason is sourdough starter being too cold.
RESCUE/FIX: Move it to a warmer place. If it’s been 24 hours since the last feed, you will need to feed it again, then leave it in a warmer place. To feed, weigh the sourdough starter and mix in the same weight in both bread flour and water. If you have a lot, discard 2/3 before weighing, then weigh and feed the same weight in both bread flour and water. Leave to double. Done! 👍
For a tonne of easy ‘warm place’ ideas see: How to keep sourdough starter warm, even in Winter
What you have read so far should solve the majority of issues that occur with growing a healthy sourdough starter. However, if you’d like to learn more, keep reading!
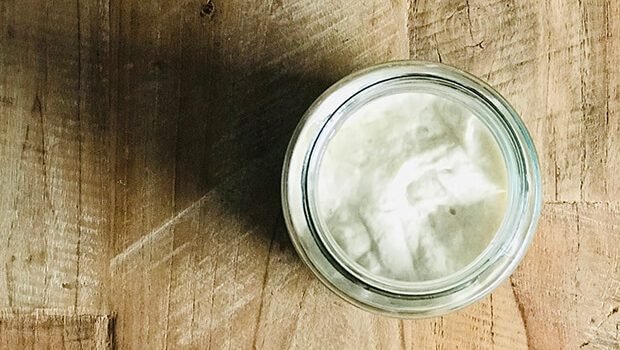
When your sourdough starter is flat & dense

The image above shows water and bread flour (12-13% protein) mixed well with one of our sourdough starters. The mix is very thick and sticky, like the consistency of toothpaste.
When your sourdough starter is dense, the flour content has not been fermented by the sourdough cultures yet, which are present but it’s not growing because of one or all three of these reasons:
- Age
- Time
- Temperature
Age
Sourdough starters are like wine. When properly cared for, they get better with age. Fortunately, it just doesn’t take several years! If you have made your own sourdough starter, it can take up to 2-3 weeks before you see significant activity and it will be a little longer before you have a sourdough starter that’s strong enough to raise sourdough bread.
This is one reason I recommend purchasing your first sourdough starter. Buying a sourdough starter that has already developed bread-raising strength, will come to life for you in a much shorter time frame without m=too much hassle or know-how. Just follow the instructions provided.
When growing any of our (100% authentic) sourdough starters, your sourdough starter will be flat and dense for the first 24 hours, after that, however, you will begin to see activity. If for some reason you don’t, well… we’ll run through that below.
Time & Temperature
These two are part of a dance together and can’t be separated.
Sourdough cultures need enough time to ferment the flour and water in the mix, and in doing so… reproduce and multiply. This process begins immediately after each feed and takes between 3-24 hours depending on temperature.
Warm= fast.
Cool = Slow
If you increase time, you decrease temperature. If you increase temperature, you decrease time!
When it doubles, your sourdough starter needs to be fed again or used in the recipe you’re making – bread, pancakes etc.
If the environment is warm it will take less time for your sourdough starter to complete the fermentation process. Warm temperatures also stimulate healthy culture activity and sometimes activates a wider variety of cultures.
In a cool environment your sourdough starter will still complete the fermentation process but over a longer time frame. Very cool and very hot temperatures hinder growth. Sourdough starter likes the same temperatures as you. ☺️
Sourdough is a bit like us. When we are cold, we like to curl up in a ball and do gentle activities, if any at all! Likewise, your sourdough starter wants to huddle and hibernate. When the starter warms up your sourdough cultures like to stretch out and do something! Grow!
If your sourdough starter is dense (and has been fed correctly with bread flour ~ 12-13% protein), it is mostly likely just in need of more time and/or warm to help complete the fermentation process.
To fix, you simply need to leave it for a longer period – half a day or more or place it somewhere warmer for a few hours.
Warmth is a gift to your sourdough starter. Try moving it to a sunny window, placing it inside your oven with just the light on, or inside a cupboard with your internet router.
You can also use warm water when you first feed your sourdough starter. I have found sourdough responds really well to this. And if you leave it somewhere warm, it will grow very quickly.
For other ideas read: How to keep sourdough starter warm so it grows in any weather, including winter
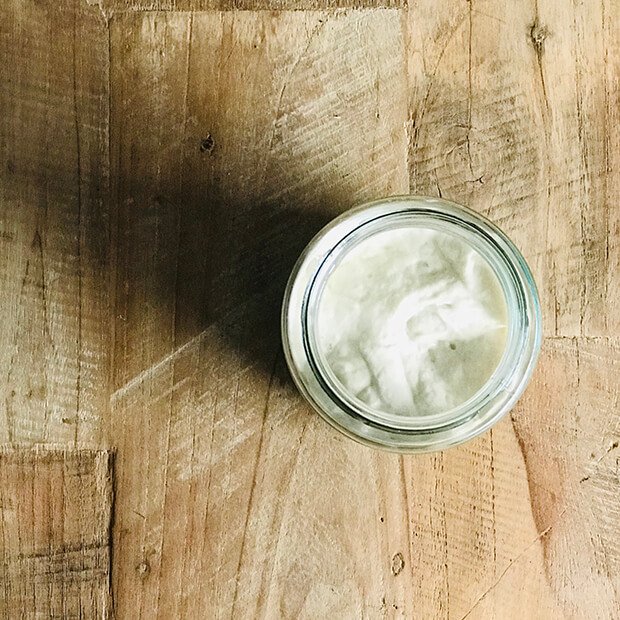
When your sourdough starter is flat & runny
This image (below) shows an active starter mix. It’s not as thick as the one above. The mix has air in it and a lot of bubbles are showing on the surface. All mixes are unique so you don’t need to see as many bubbles as this, but an active sourdough starter will show some. Check the side of the jar as they may be under the surface.
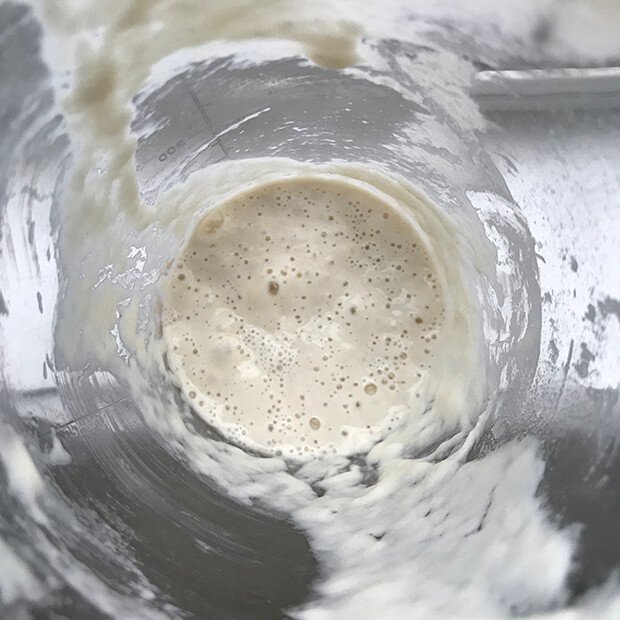
This starter has doubled and is on its way back down, deflated.
Think of a balloon. Before it’s blown up, it’s tight and dense. Once filled with air it puffs up and becomes light and airy. If filled with too much air, the structure breaks, leaving you with limp, stretched remnants of rubber.
Sourdough starter takes the flour & water from each feed, ferments it, filling it with air and turning a dense, lifeless mass into a puffy, airy one.
Once it’s grown as far as it can, the structure starts to break down or ‘burst’. When sourdough starter doubles, if not fed or used, grows past its natural peak (like the balloon filled with too much air)… and the structure holding the air in, breaks down causing the sourdough starter to collapse. to break down. too far… the structure a bubbly liquid.
How can you tell?
Instead of a dense mix inside the jar, you will be left with a runny, bubbly one. Remember the limp pieces of balloon that no longer have structure? That’s why it’s runny. it can’t hold itself up anymore.
Unlike a balloon, deflated sourdough starter will recover!!! It’s in great shape. It just needs a feed after which, you can use it to make dough.