

JUMP TO
About | Pro Tips | Equipment
RECIPE: Ingredients | STEP 1 (Feed 2)| FEED 2 (Feed 3)
Dough | Shape & Refrigerate | Bake
Welcome to a low-maintenance way of making sourdough bread and caring for your sourdough starter.
What makes this the BEST no-knead sourdough recipe?
It works.
It’s also extremely easy and the process is purposefully designed to avoid producing sourdough bread that’s flat. No special equipment or experience. No autolyse, windowpane test. Just time, your starter and some good flour.
Why is this the low-maintenance version?
Most people feed their sourdough starter daily but it’s possible to feed your sourdough starter once every month and… the bonus? No discard! The low-maintenance feeding process is built into the recipe below.
My way of making sourdough bread is a little off-beat, but it works. I have been making sourdough bread for a third of my life, ever since a trip to France changed the way I see the humble loaf.
This recipe is designed to be as foolproof as making a loaf of sourdough bread can be. I’ve created a way to make sourdough bread that’s so easy, anyone can do it! I want you to have success making your own sourdough bread. easily, and be proud of the results.
All the recipes for sourdough bread across my website are the same. The difference between them is how often you feed your sourdough starter & how you store it. And whichever way you choose, the process is written into that recipe for you.
About ~ Low-maintenance Sourdough
🗸 No-knead dough
🗸 Simple hacks to help avoid flat sourdough bread
🗸 Low-maintenance (6-week) feeding process included
STORE SOURDOUGH STARTER In the fridge*
FEED Every month OR when you bake
SOURDOUGH STARTER TO USE Any active sourdough starter that’s been stored in the fridge for up to a month.
If you don’t have an active sourdough starter, you can fast-track the process, skip the troubleshooting and tears, and grow a mature and authentic sourdough starter in under 2 days. Our Grow You Own Sourdough Starter kit is 10g of my sourdough starter (dehydrated) ready for you to water, feed and grow! Then, you get to choose how you want to store it – traditionally on your benchtop and feed it every day or in your fridge to care for it the low-maintenance way (every month or when you bake). Both methods are included in the pack.
Our other process, Pantry Sourdough Starter is also a dry sourdough starter, however, it’s designed to be stored dry on your pantry shelf without any time limit on feeding. That way, there is NO maintenance at all, but you have a sourdough starter, for those times you just want to make something sourdough! The packet includes 60g which makes 12 loaves of sourdough bread, 72 pizza bases or any combination of sourdough things.
If you’re not looking for a low or non-maintenance way to care for your sourdough starter, but a simple no-knead, easy way to make sourdough bread that works, try our Traditional no-knead sourdough bread recipe. It’s the same recipe – without the low-maintenance / pantry sourdough starter feeding processes included. ☺️
Let’s get baking!

PRO TIPS
🖤 Flour
The protein content of your flour is key. If you don’t want flat sourdough bread, this is hack #1. Use flour with 12-13% protein. Read the nutritional chart on the packet, not the name on the label. Words such as ‘strong bread flour’ mean different things to different peoples (especially manufacturers!)
For an in-depth read on flour, head over to this post: The big deal about bread flour and where to get it in Australia. It’s super easy to get the right flour!
🖤 Temperature
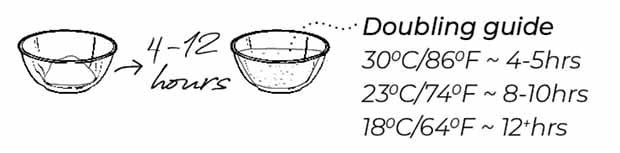
The second hack I’m going to share with you is temperature. Sourdough likes the same temperatures as you! It struggles in very cold and very hot conditions. It also naturally grows faster when it’s warmer and it slower when it’s cooler. Use temperature to stretch or condense the time it will take for your sourdough to double or, just go with the flow.
To test the temperature of your room, a small room thermometer is super helpful. You can also use the reading on your air conditioner.
For more ideas see: How can I work out the temperature of my kitchen?
For easy hacks on warming up sourdough for faster rising check out this article: How to keep sourdough warm
🖤 Structure
Puffy sourdough starter = Puffy bread.
Flat sourdough starter = Flatbread
This is a GAME CHANGER! Look for your sourdough starter to double then continue with the next step. When sourdough is ready, it will be puffy and twice its original size. It will also show bubbles along the side of the jar or bowl but the growth is what’s key. Doubling in size shows that fermentation has taken place. In particular, the structure of your sourdough starter when you use it to make bread dough is indicative of the structure of your finished loaf. Tips are provided in the recipe.
RECIPE ~ Low-Maintenance Sourdough Bread
PREP TIME 21 hours to 3 days (depends on temperature)
TOTAL HANDS-ON TIME Less than 10 minutes (excludes baking)
Equipment
Room temperature thermometer (optional)
Digital scales
Large non-metallic mixing bowl
Tupperware container (optional)
Spatula or spoon
Cling wrap
Baking paper (parchment)
Spray oil
Sharp knife
Oven gloves or thick tea towel
Dutch oven / casserole dish or pizza stone or fake both
Total ingredients
25g Sourdough starter from the fridge (0.88oz /1 Tbs + 1 tsp)
345g Water ~ Split across 2 feeds & dough (12.17oz)
495g Bread Flour ~ Split across 2 feeds & dough (17.46oz)
9g Salt (0.32oz / 2 scant tsp)
Weighing ingredients is far more accurate.
Volume measurements are Australian. (5ml tsp, 20ml Tbs and 250ml Cup)
STEP 1
FEED 2
It may feel like you’re skipping a step going straight to Feed 2 but remember – you did Feed 1 before you put the sourdough starter into the fridge. 😉 Feed 1 is the entire 25g / 0.88oz of sourdough starter that you’ve been storing cold. If you’re following this process for the first time, use 25g (0.88oz /1 Tbs + 1 tsp) of any active sourdough starter. It doesn’t matter how it was stored up to this point.
15g Warm water (0.5oz)*
20g Bread flour (0.7oz)
25g Sourdough starter from the fridge (0.9oz)
1. Add the water and flour to the jar and mix well. The consistency should be very thick and sticky.
2. Mark the level of the mix with an elastic band.
3. Leave until doubled.
*Some recipe versions say 20g/0.7 oz of water which can be used however, updating to the measurements in this post produces even better results!
STEP 2
If sourdough will be left unattended after Steps 2 or 3 (e.g overnight or workday), use tap water (except when your kitchen is cold) and leave at room temperature/cool to grow slowly. It is critical you’re available to continue when both of these steps double.
FEED 3
60g Water (2.1oz / 1/4 Cup)
65g Bread flour* (2.12oz / 1/3 heaped Cup)
1. Add the water and flour to the jar and mix well. The consistency should be thick and sticky.
2. Mark the new level with an elastic band.
3. Leave until doubled.

*Some recipe versions say 60g/2.1 oz of bread flour which can be used, however, updating to the measurements in this post produces even better results!
Step 3
DOUGH
180g Sourdough starter ~ The majority of what’s in the jar now (6.34oz)
270g Water* (9.5 oz)
415g Bread Flour (14.65oz)
9g Salt (0.32oz / 2 scant tsp)
1. Measure 180g Sourdough starter (6.34oz) into a large mixing bowl.
2. LOW-MAINTENANCE ~ FEED 1: Add 10g warm water & 10g bread flour to starter leftover sourdough starter in the jar. Stir & place in the fridge.
3. Back to dough: Add 9g of salt (0.3 oz) and 270g of water (9.5 oz) directly to the sourdough and stir vigorously to dissolve all solids.
4. Add 415g of bread flour (14.64 oz) to your bowl and mix well to combine. If you want to add seeds now is the time to do it.
5. Squeeze the mix (like a sponge) for 1-2 minutes using your hands. This will help ‘push’ water into the flour and hydrate it. Clump the dough into a ball shape and wash your hands.
6. Cover the bowl^ with cling wrap^^ and leave where the temperature will be fairly stable and let it double^^^.
As you approach the end of the rise time, check every now and then to see if your sourdough has doubled in size, especially if you just guessed the temperature. Your dough will be ready to shape when it’s nearly double its original size, puffy, and a number of bubbles may be poking through the surface or seen on the side. (Using a glass bowl makes it easy to see but not essential!)
If your sourdough starter is really active, the time guide maybe a touch too long. When making this for the first time at each temperature, check your dough when it’s been rested for 80% of the suggested time. If it’s almost doubled, your starter is really active and you can move to Shape & Refrigerate
^If you don’t mind an extra step, using a clean, lightly oiled bowl stops the dough from sticking to the bowl during the rise. When you tip the dough out later, you will keep all the lovely air pockets that form. When dough sticks to the bowl, it stretches as it releases and tears the air pockets that help it rise.
^^Using a clear reusable shower cap over your bowl, instead of cling wrap, helps put less plastic in landfill.
^^^If you find using a rounded bowl makes it difficult to see when the dough has doubled because the bowl is bigger at the top than it is at the bottom, use a large, lightly oiled, straight-sided plastic container. The straight sides make it easier to see when the dough has doubled, because the rise is evenly distributed. Mark the level of the dough with a whiteboard marker, it will come off with a gentle wipe when you’re done.
WATCH THIS STEP
Shape & Refrigerate
1. Lightly oil your bench-top and gently tip out your dough.
Work gently from here. You want to keep as many air bubbles in your dough as possible.
2. Using wet hands, pinch one side of the dough and stretch it up towards the ceiling, then fold across the dough to the other side. Pinch next to where you pinched last time and repeat. Work your way around the dough, overlapping the previous fold through the centre each time. This process is like wrapping a present tightly. Pull and stretch 12-14 times until your dough becomes tight. It will start to resist as you work until it becomes too difficult. Then you know you’re done!
3. Grab a piece of baking paper. Some flours stick to even non-stick paper. You may like to lightly oil the paper first. Gently place your dough onto the paper with the seam side facing down.
Optional step: Place your dough onto the baking paper with the seam side up instead. If you do this you will flip it over before baking. Doing this allows air bubbles to gather underneath the top surface while the dough is in the fridge and when the loaf is flipped, they moved to the bottom of the loaf, forcing them to rise to the top again during baking, improving oven spring.
4. Use the baking paper to lower the loaf into a large Tupperware container or oversized bowl.
5. Seal with the Tupperware lid or cling wrap and place into your refrigerator for a minimum of 10 hours, and up to 24 hours.
That’s it until you bake!
WATCH THIS STEP
Bake
Before following the next step, you need to choose your baking method:
Dutch oven or casserole dish
Pizza stone
Faking it – Baking without a Dutch oven or pizza stone
1. Preheat your oven for 45 minutes to 1 hour at 250°C (482°F). Remember to add your Dutch Oven, Pizza Stone or chosen bake-ware. The heat absorbed during this time is super important in helping the loaf rise.
2. After the oven has been on for an hour, take your loaf out of the fridge. Lift it from the container using the baking paper and place it on the bench.
Optional step: If you placed your loaf seam side up in the previous step, pick up the dough and gently turn it upside down*. The dough will be firm enough to handle since it is cold. Don’t do this if you skip the refrigerator method – either don’t flip it or use a banneton and baking paper to aid flipping it. Once flipped, place it back onto your baking paper. What was the bottom of the loaf should now the top. If the loaf feels very soft and your hand is starting to sink into it, DO NOT FLIP. The dough is overripe and your hand will degas it. Leave it and consider not slashing it. Bake otherwise as usual. If your loaf sticks to the baking paper when you try to flip it, your flour may have a low hydration threshold, meaning it takes on water easily. Spelt is a good example. Pre-oiling the paper helps with this. Don’t flip it this time, you risk deflating your loaf trying to remove it from the paper. Bake as normal (including slashing). If you want to try this step, add 40g less water next time to make the dough less sticky.
Your loaf will likely look flat, with a large top and small bottom. Don’t worry! It will magically transform in the oven.
* The sourdough will be firm enough to handle because it’s cold, don’t do this if you skip the refrigerator method.
3. Brush your sourdough loaf generously with water** and lightly dust with flour.
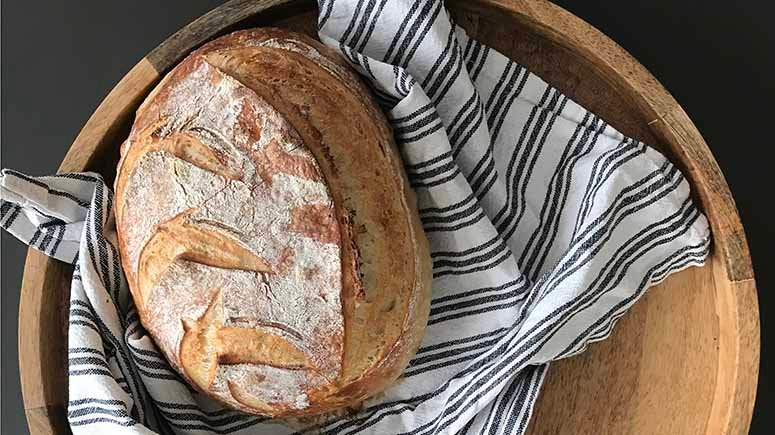
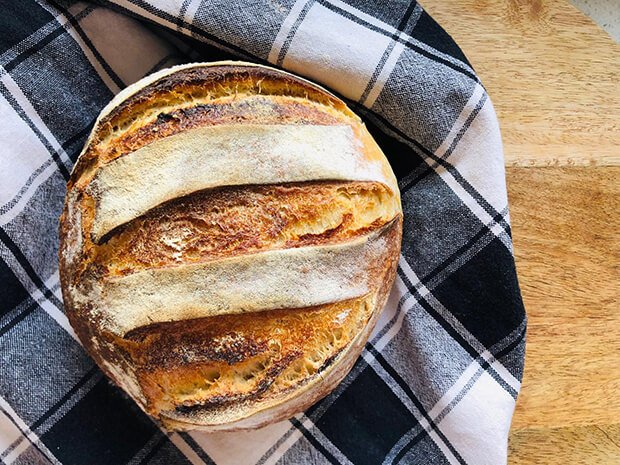
4. Using the sharpest knife you have or a razor blade move deeply, quickly and confidently on an angle through the loaf. If you go slow, the knife will drag the dough. This helps control the oven spring and make your loaf look professional.
5. To bake your sourdough bread follow the method chose:
Dutch oven or casserole dish
Pizza stone
Faking it – Baking without a Dutch oven, casserole dish or pizza stone
5. Your loaf is cooked when it sounds hollow as you knock it on the bottom with your knuckles. (Like knocking on a door.)
Allow to cool. This will give excess moisture, trapped inside, time to leave through the crust. You will end up with a better loaf and improved crumb (interior texture).
6. Celebrate & tag us!
#mysourdoughlovestory
#beautifullivingmadeeasy
@beautifullivingmadeeasy
*During proofing the top of the sourdough (exposed) hardens a little, which inhibits rising, and the air bubbles float to underneath the surface. Turning your sourdough over means the hardened dough becomes the base of your loaf, the fresh top with spring more easily, and all the air bubbles (now on the bottom) will rise through your loaf as it bakes.
**Wetting your sourdough loaf stops the crust from forming early, restricting the size of the loaf. It also helps to add gloss to the crust and make it crunchy.