

QUICK LINKS
Ingredients
Preparing your sourdough starter ahead*
No-knead sourdough pizza dough
Shaping pizza dough balls
Shaping & baking pizza bases
Storing & using / reheating bases
RECIPE MAKES
6 Large (30cm), 8 (25cm) Medium or 10 (20cm) small pizza bases
TIME
Sourdough starter time
Dough | 3 minutes + leave time
Dough ball shaping | 5 minutes + fridge time
Bases – shaping & baking | 15-25 minutes
These bases are especially good using my Fennestella sourdough starter. It’s rustic and wheaty in flavour and produces large puffy bubbles in the dough. Click here to buy

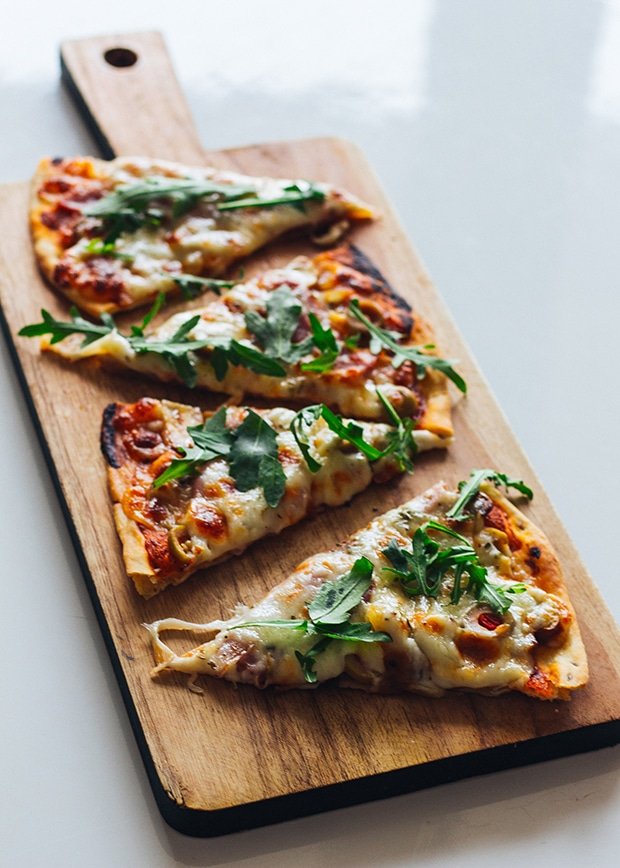
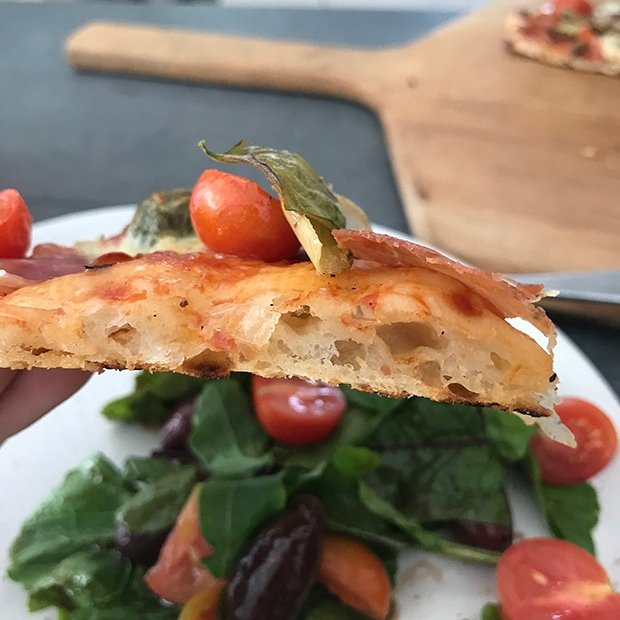
Pizza is most definitely one of my favourite things!! Especially sourdough pizza.
I just love this dough. It’s soft and pillowy, making it so elgant to work with.
Well, I no longer have a craving for a wheaty, yeasted base! Sourdough has destroyed even ‘good’ pizza for me.
Sourdough pizza bases are truly next level. It’s on repeat every Friday night in our home.
If you love pizza, also see my Woodfire Sourdough Pizza or Thin & Crispy Sourdough Pizza recipes!
Woodfire Pizza – Recipe here
Thin & Crispy Pizza – Recipe here.

Baking Ahead?
I nearly always bake my pizza bases ahead because:
1. It breaks up the workload – just top and bake later!
2. The bases develop even more sourdough flavour
3. The bases don’t go soggy with (wet) toppings
4. You can freeze them for pizza night any night!
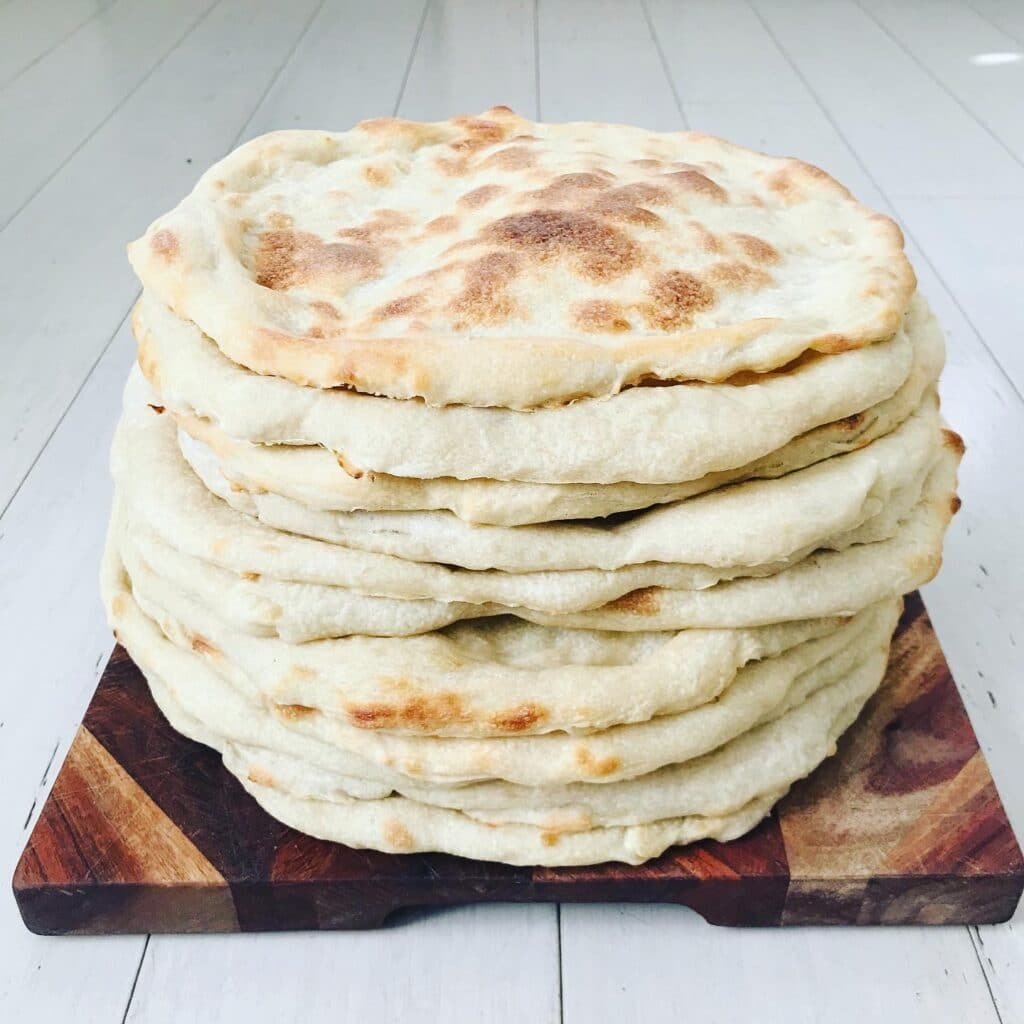
However, it does make them more crispy with the second bake. I find the interior stays soft and chewy, but if you don’t want the crunch, make these ones fresh.
If you do bake them ahead, the first bake needs to be light. Capture the oven spring and let it seal and keep the basses blonde. Then let them cool to store in the freezer or top with your favourite pizza toppings and throw them back into the hot oven to cook the toppings and melt the cheese.
Of course, you don’t have to do this! It’s just what I do. The result is sourdough pizza bases that hold their shape (defying gravity!) and have a clean, crisp flavour.
If you don’t freeze the sourdough pizza bases they will store, sealed in cling wrap or a plastic bag, on your kitchen benchtop for 1-2 days, or in the fridge for 3-4 days.
Just like the sourdough bread, sourdough pizza take a few days to make but, also like the sourdough bread, each step is just a minute or so, then you walk away and let time do the work for you.
Invest In Some Grill Mats!! Please!
If you get into making your own pizza bases and love it. I HIGHLY recommend purchasing some quality BBQ Teflon Sheets that hod they hold the sourdough pizza base perfectly. Much better than parchment or baking paper.

You can get them on Amazon (set 6), Amazon AU (set 5), eBay, or other online marketplaces.
✔️ Food safe to 260°C / 500°F (check the listing when you purchase).
✔️ Don’t move on your bench like baking paper does. Their light texture grips the pizza dough, allowing you to shape the pizza bases far more quickly and easily, especially since I am a little non-traditional in my shaping method! #opentolessons 🙂
✔️ They are also washable and reusable. Got to love that!
Fluffy No-Knead Sourdough Pizza Bases
INGREDIENTS
180g Active Sourdough Starter (6.35 oz) SEE NOTE
675g (ml) Water (1.49 lbs)
1kg Bread flour or Pizza Flour (2.2 lbs) bread flour needs to be 13% protein bread flour
18g Salt (0.64 oz)
2 Tablespoons Olive oil
1 Tablespoon Honey
NOTE
180g sourdough starter (6.35oz) is equivalent to:
1. Low-maintenance sourdough starter Your jar (or 20g) from the fridge + 2 feeds (Steps 1-2)
2. Pantry Sourdough Starter 1 Batch: 3 Feeds (Steps 1-3)
3. Traditional sourdough starter fed to more than 180g (6.35oz) so that you have some leftover to continue feeding
I highly recommend Lighthouse Bread and Pizza flour. Available at Woolworths and Coles in Australia.

PREPARE YOUR SOURDOUGH STARTER AHEAD
Low-maintenance: 2 Feeds. Steps 1-2 in the recipe card with your kit
Pantry Sourdough Starter: 3 Feeds. Steps 1-3 in the recipe card with your kit
Traditional sourdough starter or YOUR OWN STARTER: You need 180g of sourdough starter (6.35oz), fed and doubled by the time you make the dough.
No-knead Sourdough Pizza Dough
1. Tip your ripe and ready sourdough starter into a LARGE mixing bowl and add 18g of salt (0.64 oz) plus 675g of water (1.49 lbs), 2 Tablespoons Olive oil* and 1 Tablespoon honey. Mix vigorously to dissolve the sourdough.
*By measuring and adding the oil before the honey, the oil naturally greases the Tablespoon causing the honey to measure and release easily because it doesn’t stick to the tablespoon! 👌
2. Add 1kg Bread or Pizza Flour (2.214.1 oz) to your mixing bowl and mix well to combine.
3. Squeeze the mix (like a sponge) for 1-2 minutes using your hands. This will help push water into the flour to hydrate it.
The dough will magically transform over the following few hours. Don’t be tempted to add flour. It will make the dough dense. It’s messy but it’s easy!
Clump the dough into a ball shape and wash your hands.
The easiest way to clean your hands is to use a firm spatula or plastic dough cutter to scrape off the excess dough back into the bowl, then place your hands under running water and wash as usual.
4. Cover the bowl with cling wrap^. Leave until the dough doubles. ‘Almost doubled’ is ok too.
Time guide: It will take 5 to 12 hours to double depending on room temperature. The cooler your kitchen is, the slower the dough will rise. The warmer (and more humid), the faster your dough will rise. If your kitchen is cool, and you want it to rise faster, you can leave it somewhere warm. See How to keep your sourdough warm even in winter
I often plan my time to be making the dough late at night so that it rises overnight and is ready to shape in the morning. The only time I don’t do this is in Summer.
Your dough is ready to shape when it’s double the size, puffy and a number of bubbles are poking through the surface. Don’t leave it too long to before you do the next step of shaping your sourdough pizza dough balls, since the dough will eventually exhaust itself and deflate.

Shaping Sourdough Pizza DOUGH BALLS
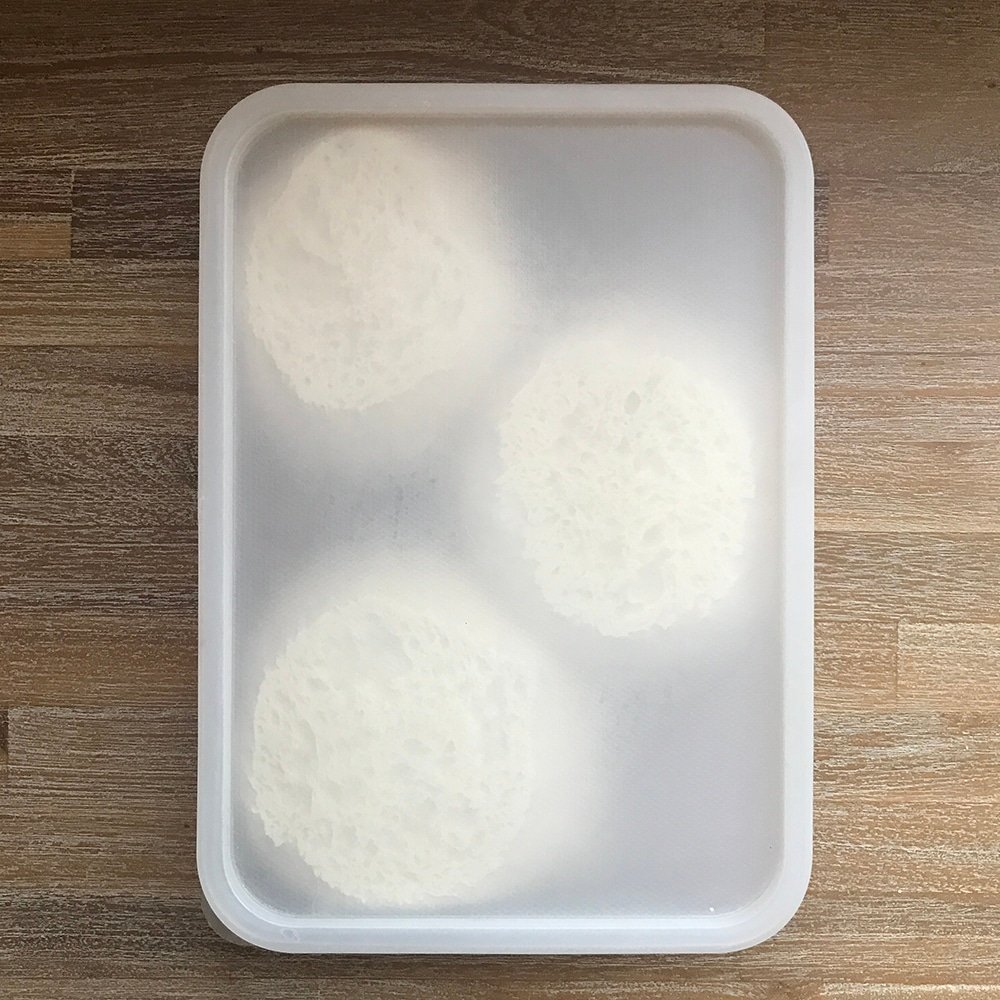
1. Divide your dough into 8 equal parts (medium 25cm sourdough pizza bases) or 6 equal parts (large 30cm sourdough pizza bases).
2. Using wet hands, pinch one side of the dough and stretch it up towards the ceiling, then fold across the dough to the other side. Pinch next to where you pinched last time and repeat. Work your way around the dough, overlapping the previous fold through the centre each time. This process is like wrapping a present tightly. Pull and stretch 12-14 times until your dough becomes tight. It will start to resist as you work until it becomes too difficult. Then you know you’re done!
It’s the same technique as for shaping our sourdough bread.
Watch:
3. Oil medium-sized freezer bags or several Tupperware containers and the underside of the lid. Place the balls of dough individually into each or if large Tupperware container, place 2-3 with room enough for them to grow up to 15-20cm wide without touching.
4. Refrigerate! Leave in the fridge for at least 10 hours and up 24 hours.
That’s it until it’s time to bake!
Shaping & Baking Sourdough Pizza BASES
OK peeps, so here’s the thing – DON’T use a rolling pin on your sourdough pizza bases! If could give you any great hack, this is it! Rolling the dough compresses the air bubbles you have spent the last few days waiting for. Air bubbles are what makes your authentically, puffy sourdough pizza base – fluffy. 😉
For softer bases, skip using a pizza stone and use a heavy baking tray. Pizza stones are porous, so by design they dry out the crust and give a crispy base. Baking trays don’t breathe and so your dough will not be able to release as much water and therefore will remain more moist.
1. Preheat your oven and pizza stone (or baking tray) to 250°C (480°F) 46-60 minutes before baking.
2. Remove your balls of sourdough pizza dough from the fridge and leaving them covered in their container, let them come to room temperature.
3. Layout the grill mats. You can use parchment paper but I find that the dough sticks and is tedious to work with.
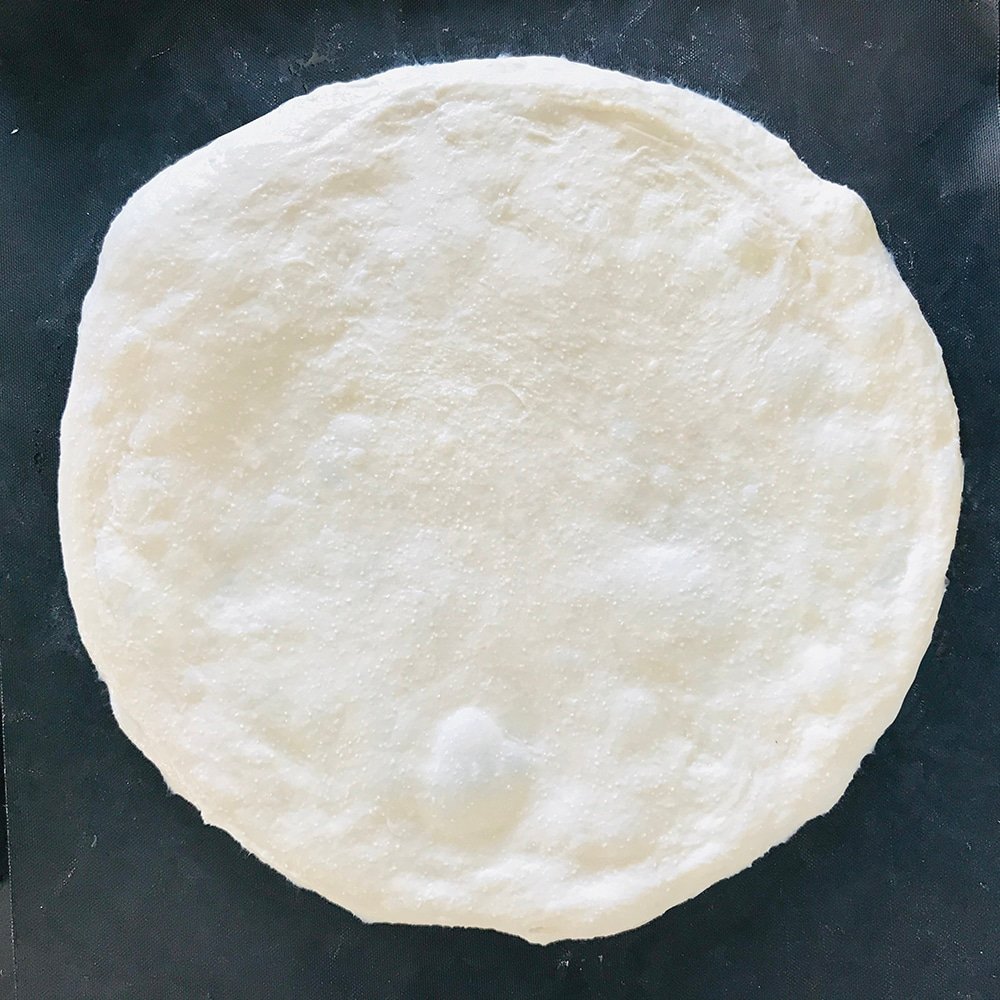
4. Take each dough ball and one at a time shape it into a pizza circle.
This is how I do it:
Have a bowl of water handy so you can use damp hands throughout (if you find the dough is sticking). Stretch a ball of pizza dough into a circle using your hands (in the air) then when it’s a little hard to handle, splay it out onto the grill mats. Gently lift the edges and pull them away from the centre to make a large circle. Try to keep the rim thicker than the centre and be mindful not to tear the centre of the base.
5. If you have time. Let the bases rest 10-20minutes in your warm kitchen while you prepare toppings or clean up. This will allow the bases to puff a little more before they’re baked,
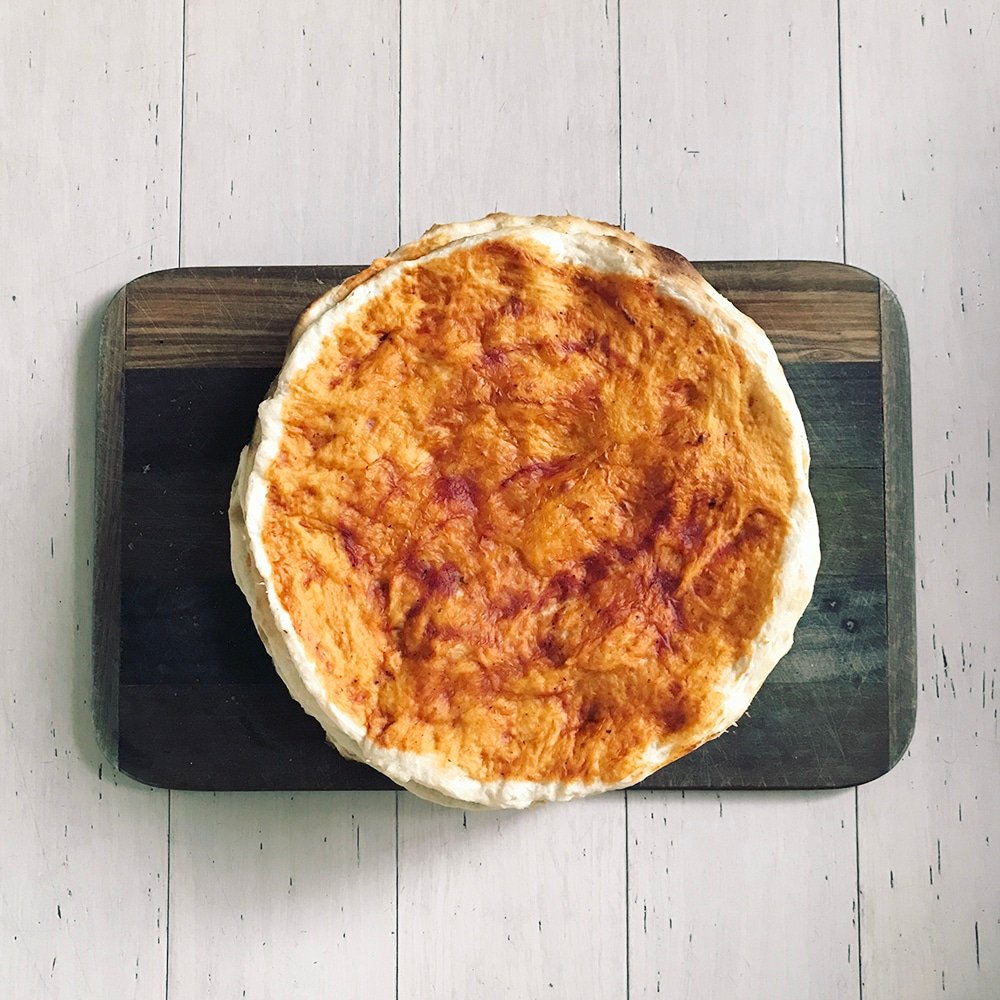
6. Top with sauce and your favourite toppings to bake now or par-bake keeping them very light in colour. It only takes a few minutes.
When baking make sure your ingredients are dry to avoid a soggy outcome!
- PAT DRY PINEAPPLE & TOMATO
- PRE-COOK MUSHROOMS
If you are baking ahead skip the sauce and topping to follow the Baking step below. Store them, air-tight, on the bench to use in the next few days, or freeze them for up to 3 months.
Baking
Place directly onto the pizza stone or baking tray and bake at 250°C (480°F) until the edges are puffy and the crust has browned a little (5 minutes if pre-baking without topping or 8-10 with topping). If pre-baking, leave them a little soft and light in colour so there is some browning left for when you use them. Check regularly. Towards the end of baking, they will turn brown very quickly. If you have topped your pizzas, make sure all your toppings have also cooked before removing from the oven and serving.
If your bases puff up in the centre, don’t worry, the bubbles will settle down when cooled or toppings added (if using straight away).
Storing sourdough pizza bases
If you baked the sourdough pizza to use later, let them cool completely and place in large freezer bags or wrap in cling wrap. They will keep on your bench for up to 2 days, in your fridge for up to 4 days and in your freezer for up to 3 months.
To use:
1. Defrost the pizza bases (if frozen).
2. Preheat your oven to 250°C (480°F). Top your pizzas and cook 5-6 minutes or until toppings are cooked and cheese has melted and browned to your liking.
